Garden Tilling Basics – Here’s How to do it Right
Tilling is the first step in preparing your garden for the following spring planting season. To help you get started, here is a step-by-step tutorial. Tilling the soil is necessary, whether you are beginning a new garden from scratch or reactivating an old one. Tilling is one of the most time-consuming but crucial aspects of gardening. Soil fertility can be improved by adding significant amounts of organic matter and preparing a garden bed for new seedlings necessitates garden tilling.
We’ve compiled a list of the best tools and techniques for tilling your garden in preparation for spring planting. Tilling is the preparation of the soil for planting by breaking it up. To cultivate a seed or seedling-ready soil bed, effective tilling churns earth eight to ten inches below the surface. It’s terrible for roots and plants to have hard and clumpy soil. As a result, it’s difficult for plants to get the oxygen, nutrients, and moisture they require if the ground is hard as a rock. When you till the soil, your plants have a better opportunity to take root, flourish, gain access to oxygen, and develop without the stress of a stressful environment. Garden tilling has other benefits besides aerating the soil for more excellent root-to-soil contact:
Prevention of weeds
To avoid weeds, tilling cuts weeds that have already started to grow and disturb any perennial weeds that have set root, preventing them from returning.
Fertilization
More nutrients are made available to plants because of tilling. Tilling helps spread and mix the compost evenly throughout the soil for better nutrient absorption.
Getting rid of unwanted guests.
An excellent technique to eliminate pests is to till the soil, which interrupts the lifecycle of latent larvae hiding in the ground all winter.
To Till or Not to Till a Garden?
Spring tilling can begin as early as March or as late as May, depending on the temperature in your area. It would help if you waited until your soil had thawed and dried out after a winter freeze and the first spring rains before doing this procedure. Soil that takes a long time to warm up is a significant problem for gardeners in the spring. A shovel or trowel can be used to see if your soil is thawed. A thawed soil will be more malleable, but a frozen one will be stiff and difficult to penetrate. Ground thawing will allow tilling to begin the growing season. Tilling helps the soil warm up faster, which speeds up the growth of your plants.
It is best to avoid tilling moist soil. As a result, roots have a more difficult time piercing through the compacted soil when the earth has dried out. Check for dryness by gently pressing one or two small clumps of dirt between your fingers. Start tilling if it crumbles too much. If the clump remains in place, it will take longer for the bed to dry thoroughly.
There is no hard and fast rule about how long you should till your garden before planting your seeds in the spring.
Your garden can’t be tended to at the perfect time. The best time to prepare is correct before planting your vegetables and crops. Plants transplanted directly into freshly tilled soil after a garden has been tended have produced spectacular results. A week before transplanting, you may also be able to break up the dirt. Breaking up your soil with various hand and power equipment will help you grow vigorous, flourishing plants.
Rake
If your garden doesn’t need a complete till, you can rake the top layer of soil to prepare it for planting, seeding, or mulching.
Hoe.
The most time-consuming method of preparing your garden for planting is to use a rake. Leave it for more minor activities like pulling weeds before using a rotary tiller or working the soil in confined areas without injuring the surrounding plants’ roots.
Hand and twist tillers are available.
To use hand rakes and hand hoes, one must exert considerable effort. Till small areas of your garden bed or work the dirt precisely between mature plants.
Broadfork
When using this hand tool, also known as a U-bar, you press the tines into the soil as deep as possible with your body weight. Break up the ground by pulling back on both grips.
Auger
Using a drill to till a new garden or a wide area reduces some back-breaking effort. This drill can be attached to a power drill to help loosen the soil and incorporate compost into the ground.
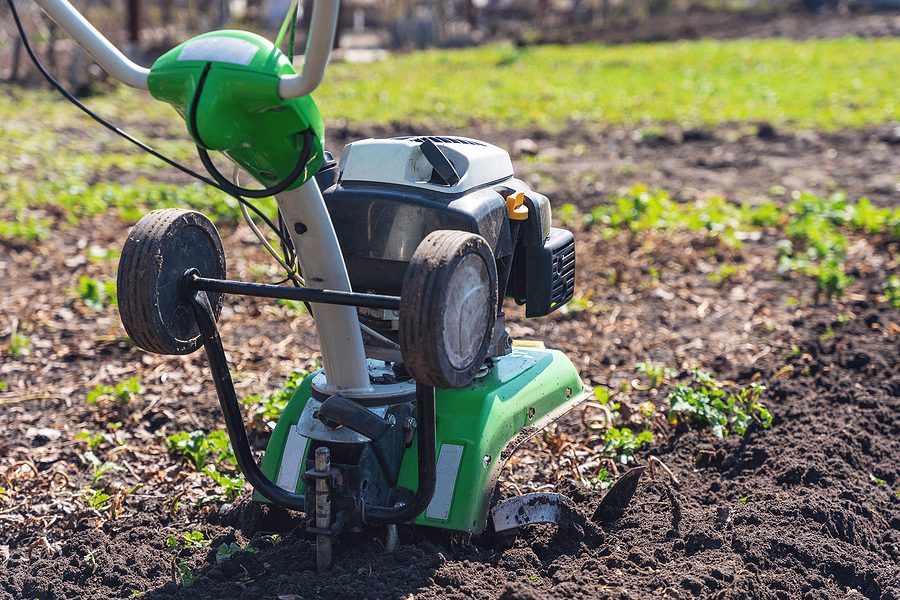
Motorized rotary tiller.
Those who do not wish to own a garden tiller can rent one. It’s powerful enough to break up enormous soil clumps, mix compost deeply into the soil, or cover last year’s dead plants with soil. For extensive garden areas or a whole bed, rototillers are the best option.
Step-by-Step Instructions for Tilling a Garden
Step-by-step instructions for preparing your garden plot for spring planting are provided here. Clear the space. Removing weeds and other debris from the landscape is essential. You can loosen weeds with a hoe and dislodge boulders and roots with a pickaxe. Otherwise, you run the danger of destroying the tiller.
Make a mark in the area. The boundaries and rows of your vegetable bed can be marked by tracing lines on the dirt or by using rope or even leftover planks.
Spread compost on the ground. When using compost, put it four or five inches deep in the indicated area before you begin tilling to ensure that it’s equally dispersed.
Get the job done slowly but steadily.
When operating a motorized tiller, it’s essential to have a calm and steady pace. Don’t go too fast with the machine. Allow enough time for each row to be thoroughly worked. Don’t ever go back. To avoid overfilling already processed sections, row by row like you would while mowing the lawn. Overfilling causes the soil to become compacted. You’re looking for something loose and breathable.